

使用 Cloud9 部署蜜蜂機關槍來測試目標
總覽
蜜蜂機關槍 是一個開放的網頁負載測試套件, 它會生成一些小蜜蜂(EC2機器) 去攻擊(負載測試)一個目標。目標可以是一個網頁、負載均衡器或是 CloudFront。 蜜蜂機關槍可以被部署在 AWS EC2 的 Linux 或是 Ubuntu 的系統上,但是在這個實做中,我們會嘗試將其部署在 AWS Cloud9 上面。

大綱
這個實作會用蜜蜂機關槍去測試自動擴展的EC2。你會需要創造一個蜜蜂主機去管理底下的小蜜蜂,讓他們去進攻一個負載均衡器。
切記, 小心的操作以避免錯誤的攻擊
實作步驟
一、建立小蜜蜂的防火牆
由於我們會使用 Cloud9 建立蜜蜂主機,所以它會自動建立起防火牆。但我們仍須為底下的小蜜蜂建立他們自己的防火牆。
-
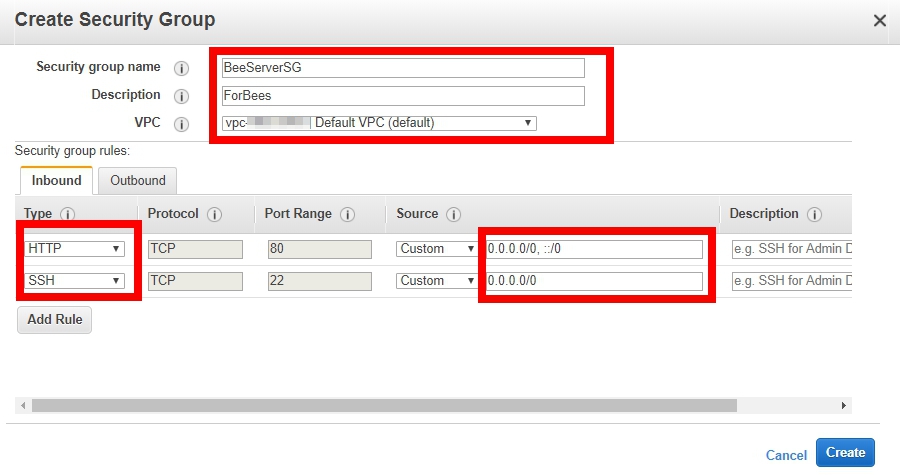
進去 EC2,選擇 Security Groups,創建一個 Security group 然後輸入以下資料:
- Security group name :
BeeServerSG - Description :
ForBees - VPC : Choose
Default VPC
- Security group name :
-
Inbound rules:
- Type :
HTTP, Port Range:80, Source:0.0.0.0/0 - Type :
SSH, Port Range:22, Source:0.0.0.0/0
- Type :
二、生成一組金鑰給小蜜蜂
因為是使用 Cloud9 建立主機,所以我們不需要任何金鑰或密碼就能操作 Cloud9 的服務。但是小蜜蜂仍需要有金鑰才能被建立。
- 在主控台頁面,點擊 Key Pairs. 創建一組金鑰並給它一個名子,它會自動下載到使用者的電腦中。
三、創建一個 Cloud9 主機在 AWS 上
AWS Cloud9 是一種雲端整合開發環境 (IDE),您只需要一個瀏覽器便能撰寫、執行和偵錯程式碼。它包括一個程式碼編輯器、偵錯程序和終端機。Cloud9 已預先封裝常用的程式設計語言 (包括 JavaScript、Python、PHP 等) 基本工具,因此不需要安裝檔案或設定開發機器就能直接開始新的專案。由於 Cloud9 IDE 在雲端上執行,因此無論您是在辦公室、家裡或任何地方,只要有一台連接網際網路的電腦就能投入專案的工作。我們會使用 Cloud9 建立蜜蜂主機已生產小蜜蜂機器。
-
在 Service 選單上,點擊 Cloud9 並建立環境。
-
在 name 裡輸入 :
BeeServer, 其他欄位保持預設值然後點選 Create environment
因為我們只要實作一個簡單的 Lab,預設值就夠用了。
現在你會得到一個EC2 ,可以在 Cloud9 網頁上進行操作了
四、更改蜜蜂主機憑證和 IAM 規則
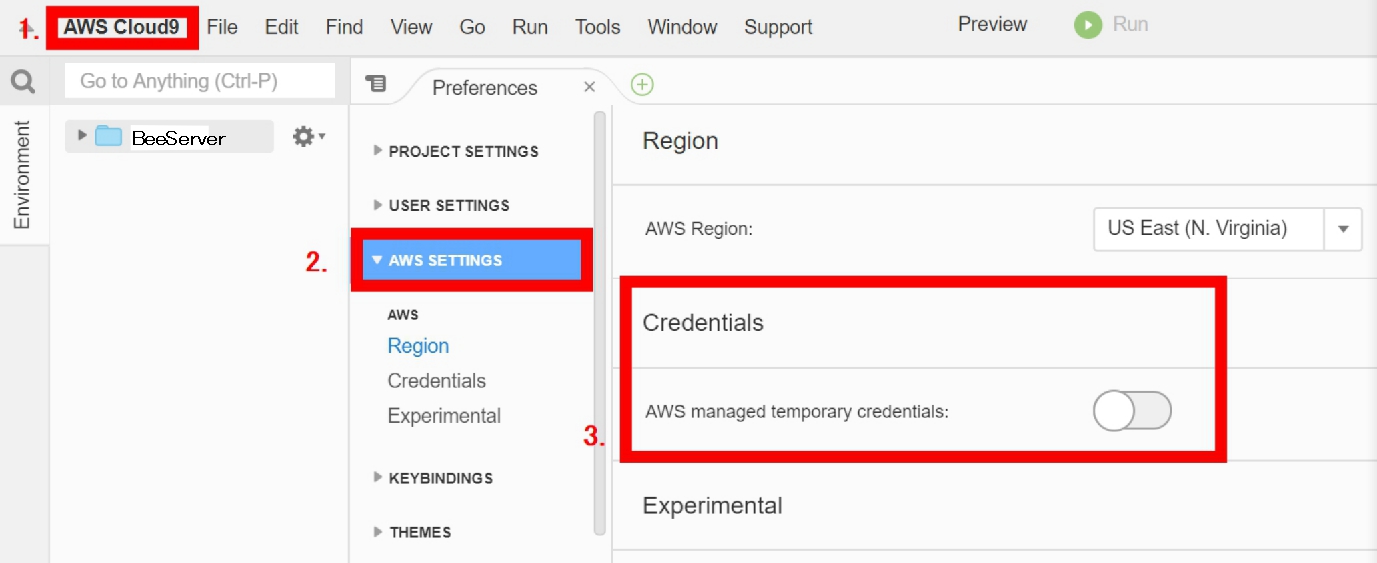
我們想擁有關於這台主機的所有權限,所以在這個步驟,我們需要先關閉 Cloud9 臨時提供的 IAM 憑證。
-
點選頂端的 AWS Cloud9, 選擇 Preferences 內的 AWS setting。將 Credential 改成 off
-
在 Service 選單上,點選 EC2.
-
在有
aws-cloud9名稱的主機上點右鍵,選擇 Instance Settings 裡面的 Attach/Replace IAM Role.
這裡,我們需要一個名為 AllowEC2Admin 的 IAM Role,它需要有 AdministratorAccess 的 Policy name。
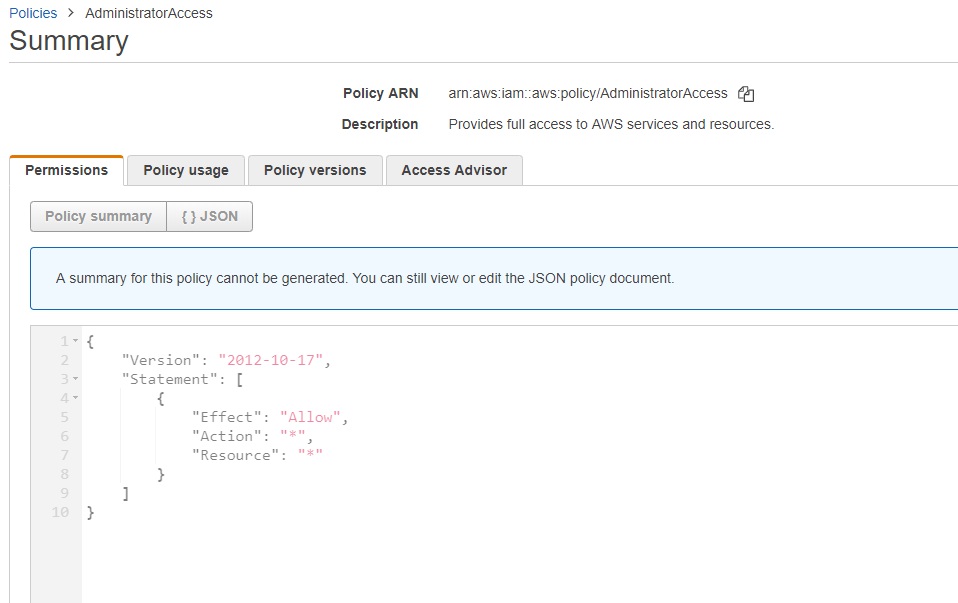
- 點選 IAM Role 後選擇 AllowEC2Admin,點選 Apply 儲存選擇。
五、使用 Cloud9 建立蜜蜂主機的環境
在這個部分,我們會架設好蜜蜂主機的環境,包括上傳小蜜蜂使用的金鑰、從 Github 上下載 BeeswithMachineGuns 的套件等等。
-
在 Service 選單上,點選 Cloud9
-
點選上方的 File 後選擇 Upload local file。
-
點選 Select files 後選擇你的 Keypair。
注意,Cloud9 是基於 Linux 系統建置而成,請先確定上傳的金鑰檔案為 Keypair.pem 而不是 .ppk。
-
將金鑰移至正確的位置,看到 Cloud9 下方然後輸入:
sudo mv MyAmazonKeypair.pem /home/ec2-user/.ssh -
安裝 Python-Paramiko
sudo yum install python-paramiko git
Paramiko 是建立在Python環境下的一個模版,遵循SSH2協議,支持以加密和認證的方式,進行遠程服務器的連接。使用paramiko可以遠程連接到Linux服務器,查看上面的日誌狀態,批量配置遠程服務器,文件上傳,文件下載等。BeeswithMachineGuns 需要使用Python Paramiko才能部署小蜜蜂。
-
進入 tmp 資料夾,下載 BeeswithMachineGuns 進入 Cloud9
cd /tmp sudo git clone https://github.com/newsapps/beeswithmachineguns.git -
安裝蜜蜂機關槍
cd beeswithmachineguns/ sudo python setup.py install -
建立 .boto 設定檔
cd /home/ec2-user/
nano .boto
Boto 是一個 Python 功能包,提供Amazon Web Services的接口。 目前,所有功能都適用於Python 2.6和2.7。
-
輸入資訊進入.Boto
[Boto]

ec2_region_name=us-east-1

ec2_region_endpoint=us-east-1.ec2.amazonaws.com

# elb_region_name=us-east-1

# elb_region_endpoint=elasticloadbalancing.us-east-1.amazonaws.com
注意 ,以前我們也會將 Access Key ID 和 Secret Access Key ID 一起寫進 .Boto檔案中。自從改為 IAM Role 以後就不再需要了。
六、生產小蜜蜂機器並測試一個目標
-
進到正確的路徑下生產蜜蜂。
cd /home/ec2-user/.ssh/
既然要生產蜜蜂,就得先熟悉相關的指令。
bees up : 在 AWS 上生產小蜜蜂主機
bees down : 停止並刪除小蜜蜂主機
bees report : 監控所有蜜蜂主機並回傳一個報表
bees attack : 指揮你的小蜜蜂去攻擊一個目標
bees up
-s : 小蜜蜂的數量
-k : 金鑰名稱
-z : 可用區域(Availability Zone)
-g : 防火牆名稱(Security Group Name)
-l : 使用者名稱
-i : AMI ID
-t : 小蜜蜂的機器規格
bees attack
-n : 攻擊次數
-c : 參與攻擊的蜜蜂數
-k : 金鑰名稱
-u : 目標位址
- 使用 bees up 指令生產蜜蜂
可以只提供關鍵資訊,剩下的會自動寫入預設值,像是:
bees up -s 2 -k MyAmazonKeypair
但是我們建議使用完整的命令:
bees up -s 2 -k MyAmazonKeypair -z us-east-1a -g BeeServerSG -l ec2-user -i ami-xxxxxxxx -t t2.micro
你可以在這裡找到你的 AMI ID。

-
以下是我的範例,等待所有蜜蜂為他們的機槍上膛後,使用
bees report去確認蜜蜂的情況$ bees up -s 2 -k amazonec2_keypair_virginia -z us-east-1a -g BeeServerSG -l ec2-user -i ami-0080e4c5bc078760e -t t2.micro Connecting to the hive. GroupId found: BeeServerSG Placement: us-east-1a Attempting to call up 2 bees. Waiting for bees to load their machine guns... . . . . . Bee i-056ebcd7e3c696aea is ready for the attack. Bee i-02c05258c2f4fddf0 is ready for the attack. The swarm has assembled 2 bees. $ bees report Read 2 bees from the roster: us-east-1a Bee i-056ebcd7e3c696aea: running @ 34.201.71.95 Bee i-02c05258c2f4fddf0: running @ 54.196.220.186 -
使用 bees attack 指令測試你的負載均衡器或是網頁
再次注意,為了避免不必要的攻擊,請不要隨意測試其他網頁!
測試用的 Command
bees attack -n 10000 -c 2 -k MyAmazonKeypair -u "Target"
範例:
-
測試 ELB:
$ bees attack -n 10000 -c 2 -k amazonec2_keypair_virginia -u http://WebServerLB-1439117582.us-east-1.elb.amazonaws.com Read 2 bees from the roster: us-east-1a Connecting to the hive. Assembling bees. Each of 2 bees will fire 5000 rounds, 1 at a time. Stinging URL sequentially so it will be cached for the attack. Organizing the swarm. Bee 0 is joining the swarm. Bee 1 is joining the swarm. Bee 1 is firing her machine gun. Bang bang! Bee 0 is firing her machine gun. Bang bang! ab -v 3 -r -n 5000 -c 1 -T text/plain -e /tmp/tmp.tPwrI177vh -C "sessionid=NotARealSessionID" "http://WebServerLB-1439117582.us-east-1.elb.amazonaws.com/" 2>/dev/null | grep -F "Time per request: Requests per second: Failed requests: Connect: Receive: Length: Exceptions: Complete requests: HTTP/1.1" ab -v 3 -r -n 5000 -c 1 -T text/plain -e /tmp/tmp.K8I7g4ksB0 -C "sessionid=NotARealSessionID" "http://WebServerLB-1439117582.us-east-1.elb.amazonaws.com/" 2>/dev/null | grep -F "Time per request: Requests per second: Failed requests: Connect: Receive: Length: Exceptions: Complete requests: HTTP/1.1" Bee 0 is out of ammo. Bee 1 is out of ammo. Offensive complete. Complete requests: 10000 Failed requests: 0 connect: 0 receive: 0 length: 0 exceptions: 0 Response Codes: 2xx: 10000 3xx: 0 4xx: 0 5xx: 0 Requests per second: 69.460000 \[#/sec\] (mean of bees) Time per request: 28.797500 \[ms\] (mean of bees) 50% responses faster than: 28.810000 [ms] 90% responses faster than: 31.504000 [ms] Mission Assessment: Target crushed bee offensive. The swarm is awaiting new orders. -
測試 CloudFront:
$ bees attack -n 10000 -c 2 -k amazonec2_keypair_virginia -u http://d37x0lr9gvpdwg.CloudFront.net Read 2 bees from the roster: us-east-1a Connecting to the hive. Assembling bees. Each of 2 bees will fire 5000 rounds, 1 at a time. Stinging URL sequentially so it will be cached for the attack. Organizing the swarm. Bee 0 is joining the swarm. Bee 1 is joining the swarm. Bee 1 is firing her machine gun. Bang bang! Bee 0 is firing her machine gun. Bang bang! ab -v 3 -r -n 5000 -c 1 -T text/plain -e /tmp/tmp.sDS410bR0q -C "sessionid=NotARealSessionID" "http://d37x0lr9gvpdwg.CloudFront.net/" 2>/dev/null | grep -F "Time per request: Requests per second: Failed requests: Connect: Receive: Length: Exceptions: Complete requests: HTTP/1.1" ab -v 3 -r -n 5000 -c 1 -T text/plain -e /tmp/tmp.azPT7ewdAW -C "sessionid=NotARealSessionID" "http://d37x0lr9gvpdwg.CloudFront.net/" 2>/dev/null | grep -F "Time per request: Requests per second: Failed requests: Connect: Receive: Length: Exceptions: Complete requests: HTTP/1.1" Bee 0 is out of ammo. Bee 1 is out of ammo. Offensive complete. Complete requests: 10000 Failed requests: 0 connect: 0 receive: 0 length: 0 exceptions: 0 Response Codes: 2xx: 10000 3xx: 0 4xx: 0 5xx: 0 Requests per second: 62.180000 \[#/sec\] (mean of bees) Time per request: 32.181500 \[ms\] (mean of bees) 50% responses faster than: 3.122000 [ms] 90% responses faster than: 216.737000 [ms] Mission Assessment: Target crushed bee offensive. The swarm is awaiting new orders. -
實驗結果
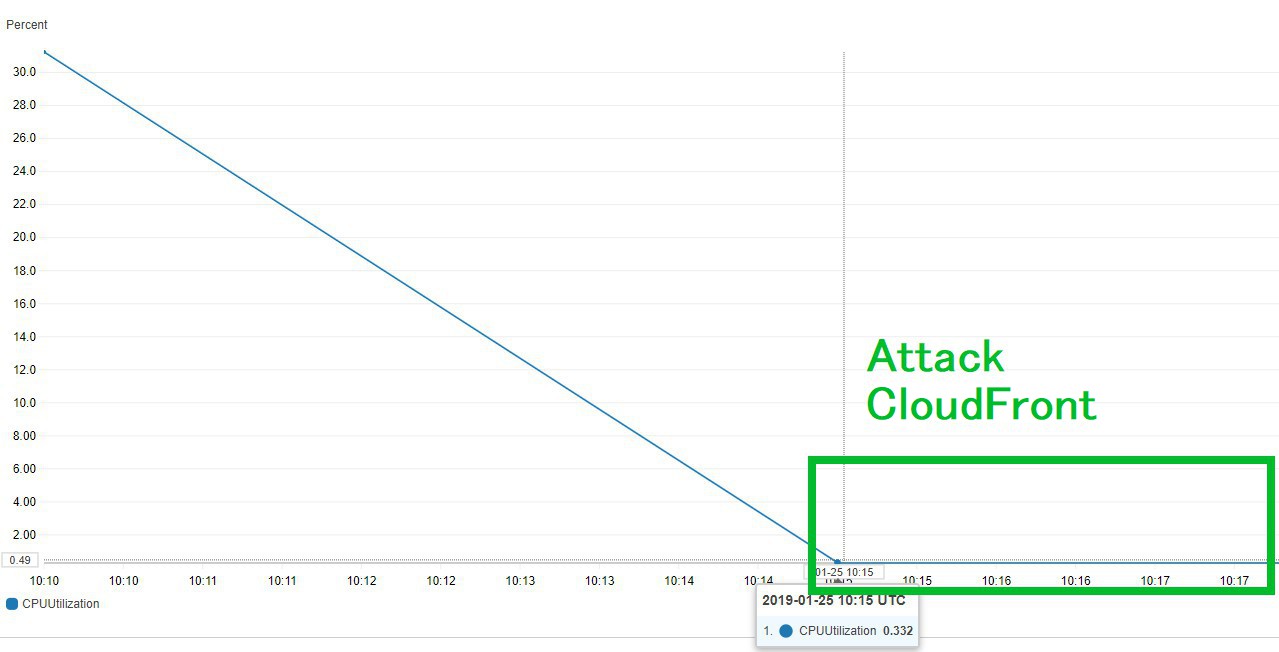
本次實驗的數據可以在 CloudWatch 上看到。
-
完成攻擊後,使用
bees down停止所有蜜蜂行動。$ bees down Read 2 bees from the roster: us-east-1a Connecting to the hive. Calling off the swarm for us-east-1a. Stood down 2 bees.
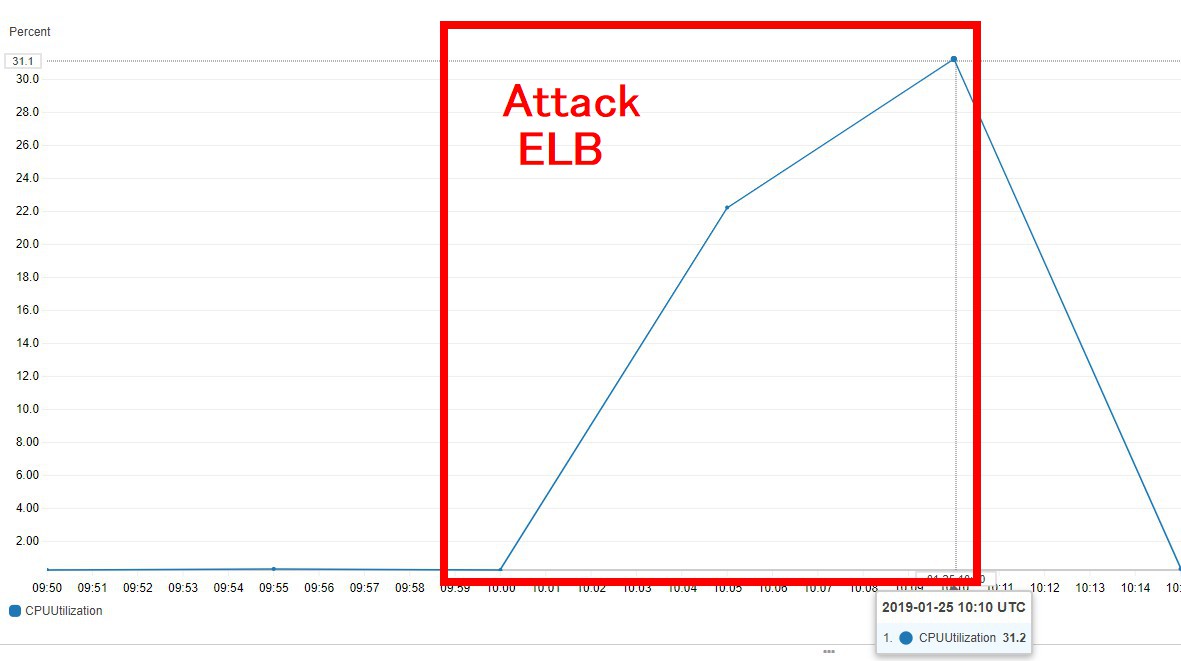
在這次的實驗裡,我們可以看到蜜蜂攻擊 ELB 和 CloudFront 時的不同處。當 ELB 面對一萬次攻擊時,它的CPU會在短時間內飆升到很高的使用率(31.2%)。但是當 CloudFront 面對一萬次攻擊時,CDN 和 快取 可以有效地降低 CPU 的使用率(0.332%)。可以證明,當我們要讓伺服器面對外部網路時,使用 CloudFront 來多一層保護是比較好的選擇。
總結
完成這次的實作以後,你可以學到如何創建一台 Cloud9 的主機,再用 Cloud9 主機去建立其他 EC2 的主機。最後使用搭建起來的蜜蜂機關槍,去給 ELB 或者是 CloudFront 進行壓力測試。
Tag:BeeswithMachineGuns, Cloud9, Ec2, Load testing
You may also like

【焦點新聞|Microsoft Build 2022】

【焦點新聞】0428-0511 AWS 服務更新
